
I just recently found a super easy way to install and learn Kubernetes. It also happens to work on Photon OS so that means it works across VMware products and services like Fusion, vSphere and VMware Cloud on AWS, I tested it on all of them so you’re good to go!
Pre-Reqs
- Download the Photon Appliance from here
- Deploy two Photon VM’s and name them k8s-server and k8s-node1
- The default user and password is: root changme
- On each VM edit the /etc/hostname file with it’s name
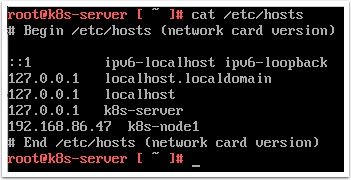
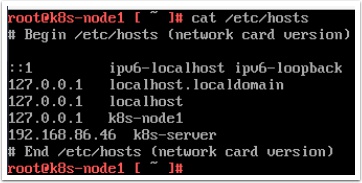
- Make sure they both have an IP address and they can resolve each other by name. NOTE: if you don’t have DNS just edit the /etc/hosts file on each vm. Also, you will not be able to ping the Photon VM’s until you update iptables.
- Reboot each vm with the command shutdown now -r
- For a quick reference for configuring Photon OS see here
They should look something like this and we are ready to go! Your IP addresses will be different.
Let’s get started shall we
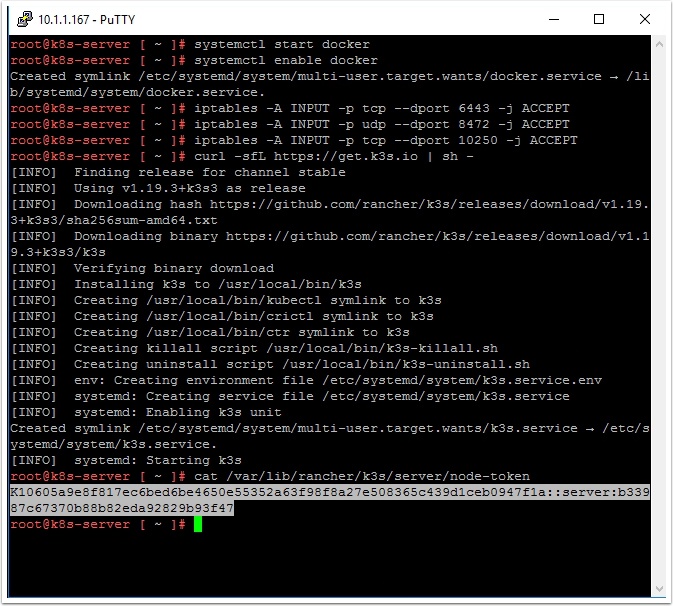
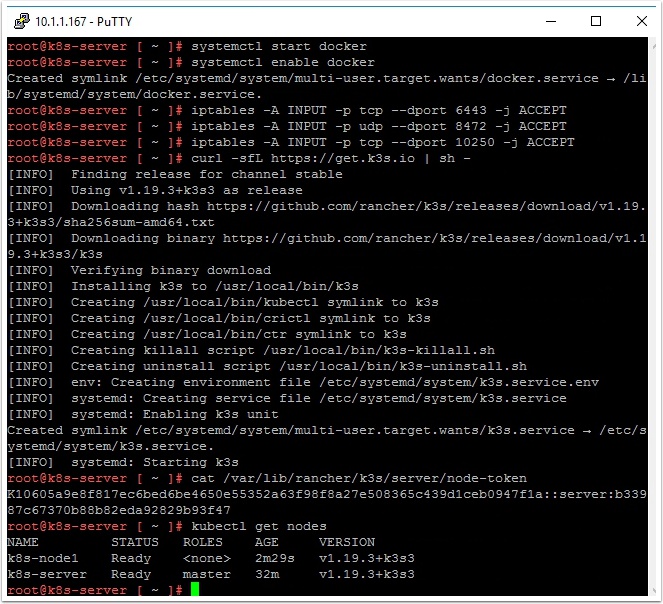
Login to your k8s-server and run the following commands:
systemctl start docker
systemctl enable docker
iptables -A INPUT -p tcp --dport 6443 -j ACCEPT
iptables -A INPUT -p udp --dport 8472 -j ACCEPT
iptables -A INPUT -p tcp --dport 10250 -j ACCEPT
curl -sfL https://get.k3s.io | sh -

Now get the node token so we can configure k8s-node1
Run the following command and copy the output to the clipboard
cat /var/lib/rancher/k3s/server/node-token
Now let’s configure our first node
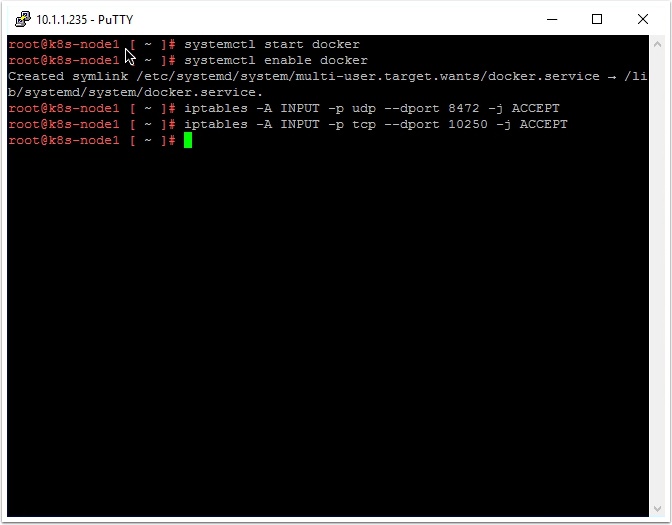
Login to k8s-node1 and run the following commands:
systemctl start docker
systemctl enable docker
iptables -A INPUT -p udp --dport 8472 -j ACCEPT
iptables -A INPUT -p tcp --dport 10250 -j ACCEPT
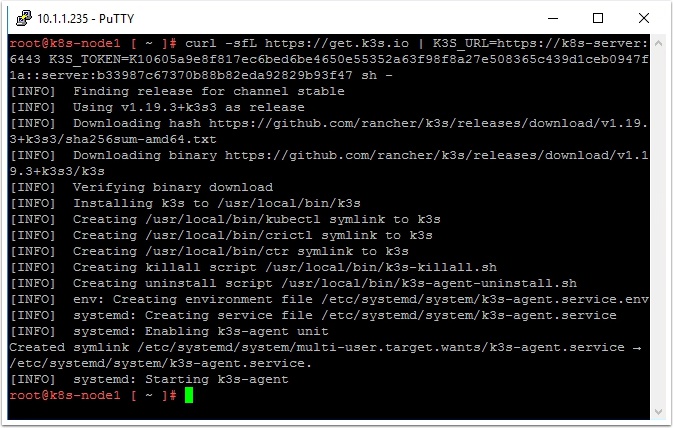
Now let’s add k8s-node1 to the k8s-server
Login to k8s-node1 and run the following command by changing the items in red to reflect your environment:
curl -sfL https://get.k3s.io | K3S_URL=https://myserver:6443 K3S_TOKEN=mynodetoken sh -
In my environment it looks like this:
curl -sfL https://get.k3s.io | K3S_URL=https://k8s-server:6443 K3S_TOKEN=K10605a9e8f817ec6bed6be4650e55352a63f98f8a27e508365c439d1ceb0947f1a::server:b33987c67370b88b82eda92829b93f47 sh -
If you want to add additional nodes just create new Photon VM’s k8s-node2, k8s-node3 and run the same commands on them
Now go back to k8s-server and list the nodes
Login to k8s-server and run the following command:
kubectl get nodes
Not able to complete because of New password is not accepted.
I assume this is for Photon OS? The default password for the root account is changeme , and you must change it when you first login. For security, Photon OS forbids common dictionary words for the root password.
i try the procedure but i when try open a browser not function , and kubernetes dashboard not function
There is no dashboard in default k8s install, only command line. I will write up a new post to install the dashboard as I also prefer to have it available.
https://www.vmtocloud.com/how-to-install-k8s-dashboard-using-a-node-port/
Ran all of the commands above, including setting up the 1st node, but back on the k8s-server, the “kubectl get nodes” doesn’t show the node. It only shows the master:
root@k8s-server [ ~ ]# kubectl get nodes
NAME STATUS ROLES AGE VERSION
k8s-server Ready master 50m v1.19.3+k3s3
Is there something I can look at for debugging, like some logs or something?
Make sure from both the server and node1 one you can resolve each other by name, remember it won’t respond to ping but at least check that the names resolve. Also be sure you run the iptables commands on both the server and node, they are different for each.
when running on newer hosts you also have to open 8443 within iptables
root@k8s-master [ ~ ]# kubectl describe services folding-at-home
Name: folding-at-home
Namespace: default
Labels: app=folding-at-home
Annotations:
Selector: app=folding-at-home
Type: NodePort
IP: 10.43.79.5
Port: 7396/TCP
TargetPort: 7396/TCP
NodePort: 30181/TCP
Endpoints: 10.42.3.4:7396
Session Affinity: None
External Traffic Policy: Cluster
Events:
root@k8s-master [ ~ ]# kubectl get nodes
NAME STATUS ROLES AGE VERSION
k8s-node2 Ready 27h v1.19.3+k3s3
k8s-node3 Ready 27h v1.19.3+k3s3
k8s-master Ready master 27h v1.19.3+k3s3
k8s-node1 Ready 27h v1.19.3+k3s3
root@k8s-master [ ~ ]#
i rebuild all with you example but not funtion
Nice, now just go the the ip your k8s-server and port 30181 to manage folding at home. For example 10.31.119.10:30181
Pingback: How to install k8s dashboard using a node port | | VMtoCloud.com
Thank you!!1
Great work. So good you got me started on Photon. But now I see VMWare moved it to GITHUB? And the UEFI versions (except for 4) break TDNF. So my question is whether VMWare is phasing Photon out? Should I be looking at Debian?
Works like a charm, many thanks!
I was strugling to make it work on Photon.
Excellent guide, I have it running on my little Dell 2950 server with VMware 6.0!!
Added Portainer io on docker and away I went!! Cool thanks!!
All worked as planned until I joined k8s-node1 to the cluster. It joins, but comes up as ‘ready’ but with role ”.
When I run a Kubectl command on the k8s-node1 I get: “The connection to the server localhost:8080 was refused – did you specify the right host or port?”.
Kubectl describe node k8s-node1 (on the k8s-server) shows an error:
“invalid capacity 0 on image filesystem”!?!
shoot, I think it’s a K8s thing (must run Kubectl commands on master node)?
This worked so well, thanks for the help!
1 issue I’m having is that I can only access the nodeport on the node that the pod is running on. I’m not sure why, but I have opened all ports (just a lab environment in ESXi) and enabled forwarding in IPtables.
Anyone else had this issue, if so has anyone found a solution?
Solved!!!
added forwarding to iptables:
iptables -P FORWARD ACCEPT
and I added a file /etc/sysctl.d/kubernetes.conf with the following contents:
net.ipv4.ip_forward = 1
net.bridge.bridge-nf-call-ip6tables = 1
net.bridge.bridge-nf-call-iptables = 1
then ran sysctl –system
Works like a champ! I added a second node as well.
Nice, thank you for validating and happy containering! 😉