
Updated 9/3/2015 – This is the old way using the Design Center. See here for the new way using vRO extension. https://www.vmtocloud.com/vravcac-chef-client-extension/
One of the things I love about vCAC is it’s ability to integrate with just about anything right out of the box. Add vCO to the mix and you have a very powerful and robust cloud automation solution. I am often asked if we can integrate with other automation solutions and how we complement them. Many customers are already using open source solutions like puppet and chef and have invested in those technologies. Yet many still struggle with being able to tie it all together into a solution that their developers and application teams can consume. Since vCAC is the easiest solution on the market to stand up a self service portal it is a no brainier to use it as the front end. Add to that vCAC’s unique governance features to control whom can access what and when and you have a powerful cloud solution that is made for the requirements of your organization. Not the masses.
Watch the quick demo of this solution here http://youtu.be/EpD269oOyIA
First off, this how to guide is a not about Chef. It is not really even designed exclusively for Chef. You could use this for any of the popular open source solutions like Puppet and Salt for example. With that said I am not going to discuss a lot about how Chef works. There are plenty of resources already available on that. If you are reading this you should already have a good understanding of technologies like Chef. In this guide I am using the free hosted Chef. You can get your own by visiting https://getchef.opscode.com/signup , there you can get a free version of hosted Chef that allows up to 5 nodes. I have never used Chef before writing this. I followed the guide at https://learnchef.opscode.com/quickstart/workstation-setup/ and a lot of goggle searches to get Chef up and running. This example is using a run list to install Chef Recipes. It could easily be modified to add the Provisioned VM to a role so you can run multiple run lists. For example if you wanted the requester to choose a Lamp Stack.
This is also not a post about using vCAC and vCO as there is already a ton of info out there. For helpful information on this integration visit http://www.vcacteam.info/index.php/articles/vcac-configuration/29-configure-vcac-connection-to-vco
Well, let’s get started…..
There are some pre-requirements you will need in place
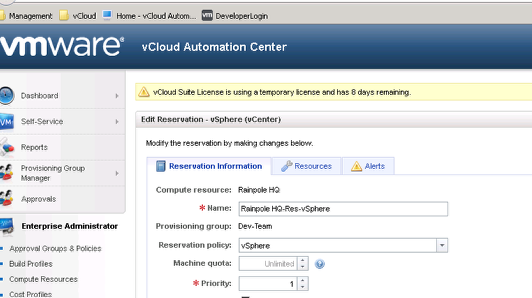
You need to have vCAC installed and at least one vSphere reservation for provisioning.
Next you need to have vCO installed and the vCenter plug-in talking to the vCenter that vCAC will provision to
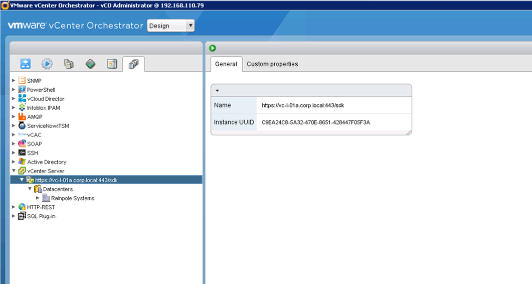
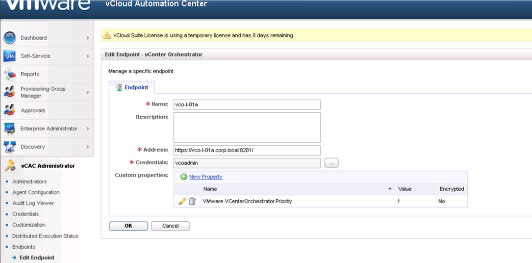
Make sure that vCO is configured as an endpoint in vCAC
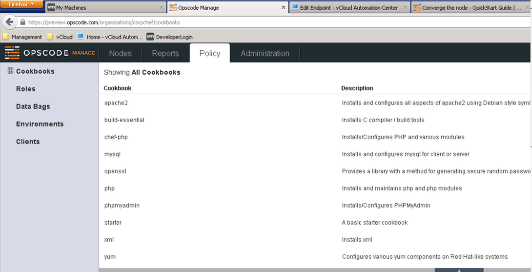
Next you will need a hosted Chef Server with your cookbooks loaded
Finally you will need a template in vCenter configured with the Chef client and the starter kit for your Chef Server (See note below on how test connectivity)
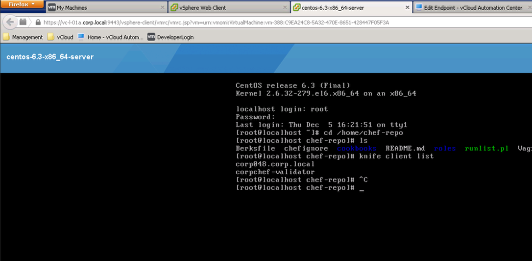
execute the command knife client list to verify you have connectivity to your Chef server.
Now lets setup the template for vCAC to use, Putty into the template VM and change directory to /home/chef-repo
Now lets use vi to create a script that we will call to converge the node with the Chef Server
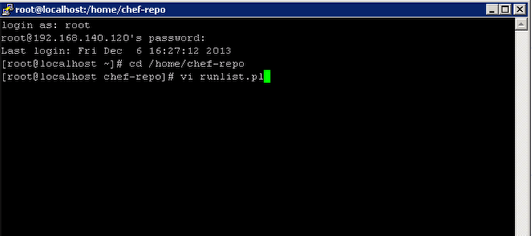
type vi runlist.pl and press enter
Type the following line and save the file
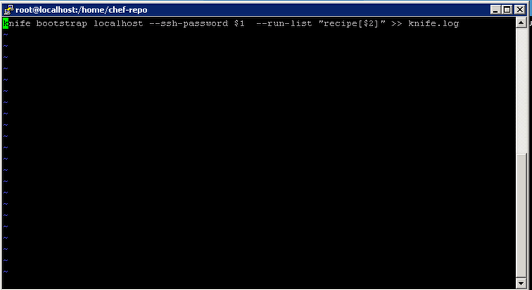
knife bootstrap localhost --ssh-password $1 --run-list "recipe[$2]" >> knife.log
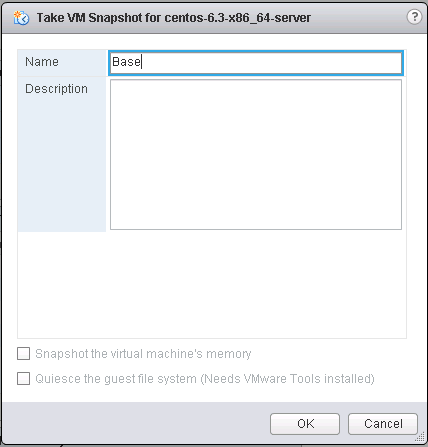
Shutdown the VM and make a snapshot, name it Base. We will use this for our linked clone Blueprint in vCAC
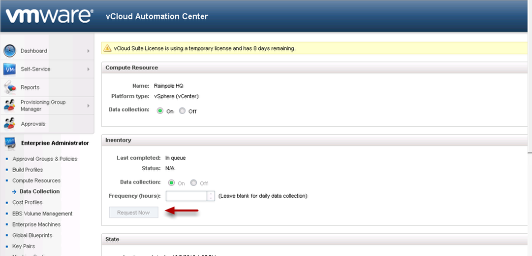
Login to vCAC and run an inventory scan to pick up the new snapshot
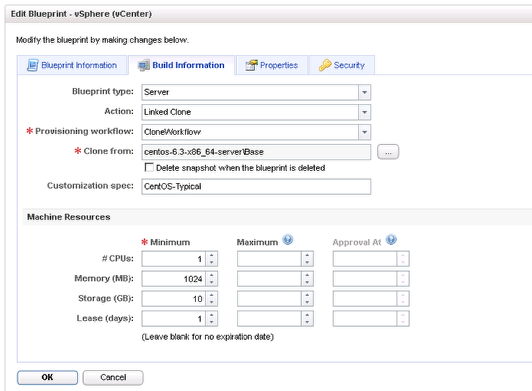
Create a new vSphere Linked Clone Blueprint using the Chef Template you created
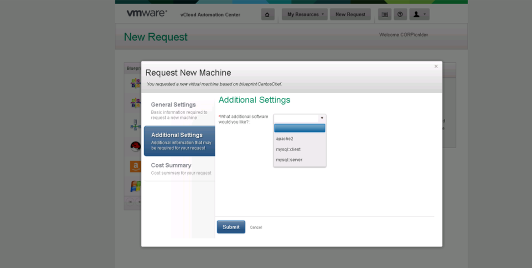
Create a new property definition that we will use for user selection of what Chef Recipe will get installed

Create the SoftwareInstall property as shown above
Add the following property attributes as shown

Now add the following custom properties to your Chef Blueprint, you can copy and paste them below ( You could also Encrypt the password for security.
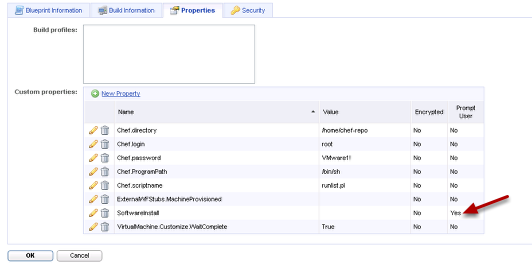
Chef.directory
Chef.login
Chef.password
Chef.ProgramPath
Chef.scriptname
ExternalWFStubs.MachineProvisioned
SoftwareInstall
VirtualMachine.Customize.WaitComplete
Now open the vCO Client and navigate to the vCenter Workflow “Run program in Guest” and make a duplicate named KnifeBootstrap
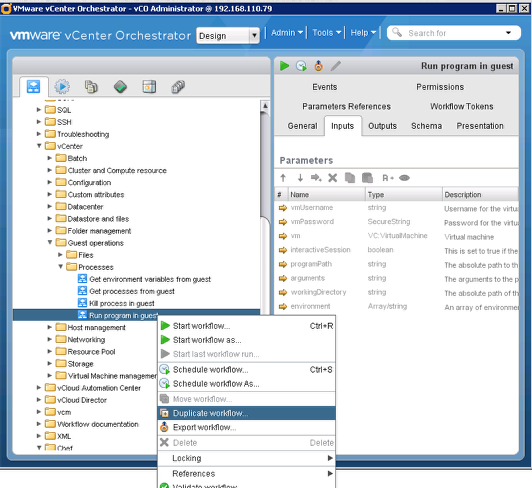
Next you will need to download and install the getVMbyname action and import it into vCO you can find it at the link below. This was created by Omer Kushmaro over at elasticskies.com reach out to him @elastic_skies and tell him how much you his work.
Edit your the workflow you copied earlier. The reason is that vCAC sends vCO input in the form of a string. The Run Program in guest workflow wants you to browse the tree in vCO to find the VM to run a program in. So we need to use Omar Kushmaro’s great script to find a VM by the host name.
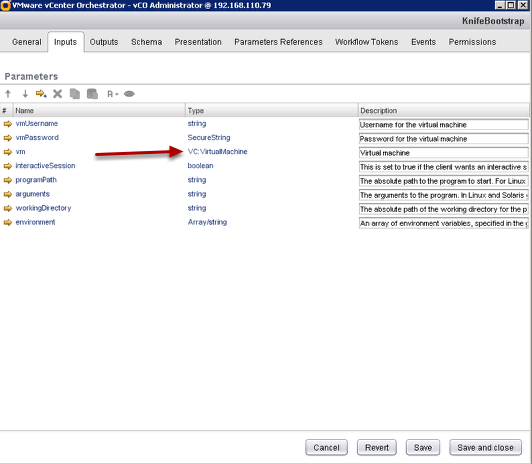
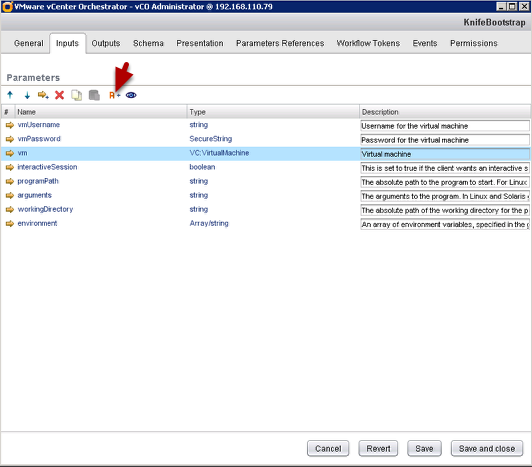
Move the VM Parameter to an Attribute (Don’t worry, I have attached the workflow below as well, just want you to see how to do it)
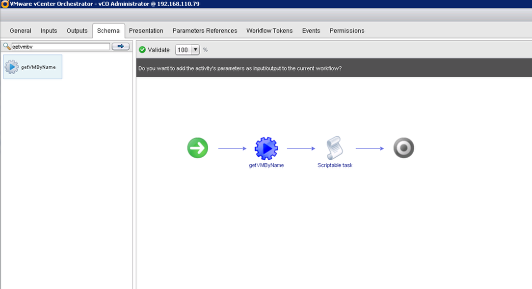
Now go to schema and add the getVMbyname action to your workflow and click to add the activities parameters to the current workflow and promote the parameters
Now edit the getVMbyName action and set the bindings as shown

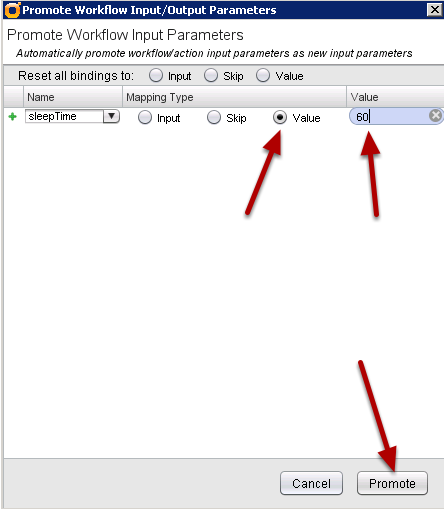
Now add a Sleep action from the basic menu and click setup
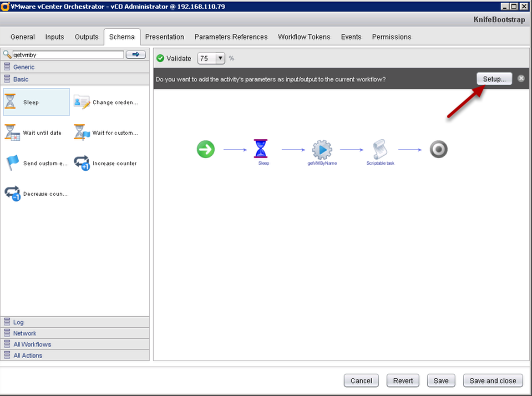
Change the mapping type to Value and type 60 and click promote. (Note: we are making the workflow sleep for a minute to wait for the Operating system to boot. Otherwise it will try to launch the Chef Client before the network is setup) You may need to play with this depending on your operating system and any scripts that may be running)
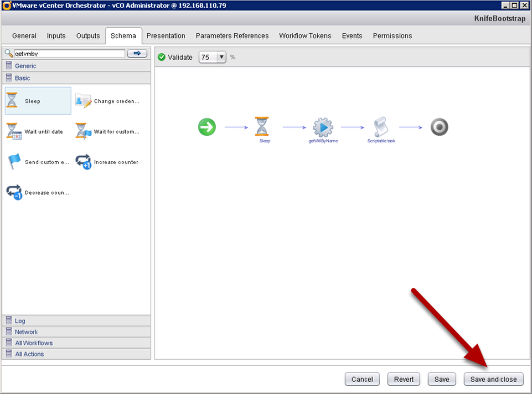
Now validate your workflow and Delete the action result parameter
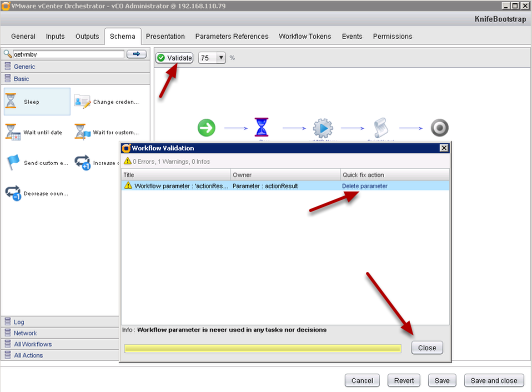
Now Save and Close the workflow
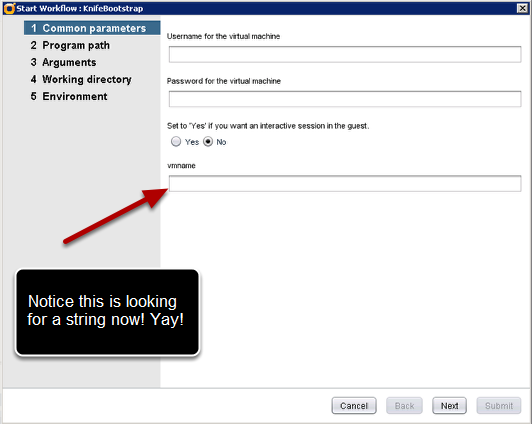
Now run it just to test it works
Now open vCAC designer and load the WFStubMachineProvisioned
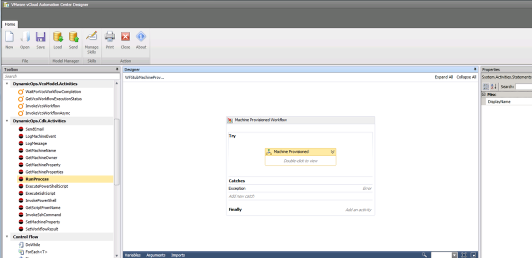
Dig down to the custom code section by clicking Machine Provisioned, Custom Code and drag and drop the following into your workspace
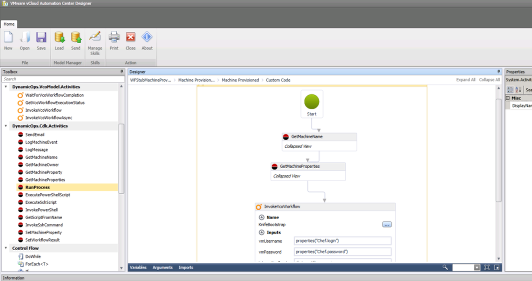
Setup the GetMachineName as shown

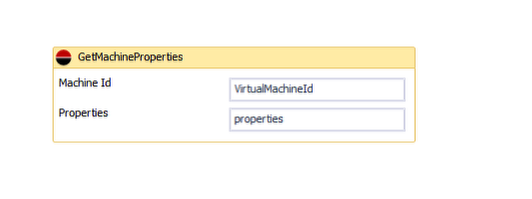
Setup the GetMachineProperties as shown
Browse to your new workflow and setup the InvokevCOWorkflow as shown (The inputs are below for you to copy and paste
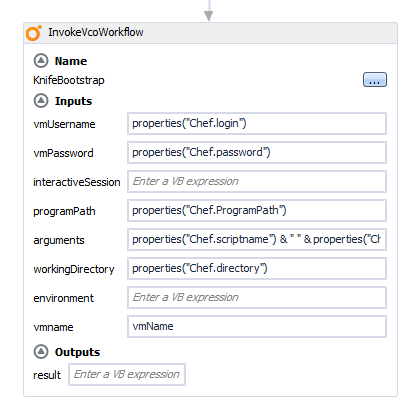
vmUsername: properties(“Chef.login”)
vmPassword: properties(“Chef.password”)
programPath: properties(“Chef.ProgramPath”)
arguments: properties(“Chef.scriptname”) & ” ” & properties(“Chef.password”) & ” ” & properties(“SoftwareInstall”)
workingDirectory: properties(“Chef.directory”)
vmname: vmName
Add the following variables and send your workflow to the server

All set, now provision a new server from the portal and see your new additional settings choice
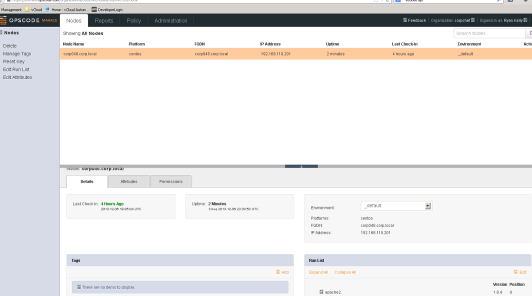
If all worked out you should see the new node added to chef and the run list
Pingback: vCAC Extensibility Quick Reference Guide | VMtoCloud.com
Pingback: Tech Leaders Showcase Chef Support at #ChefConf 2014 | Chef Blog
I can see the properties variable type, etc. Can you please post it?
Hi Dan,
It is type Dictionary (String, String) New Dictionary type.
BTW this is the old way. If you are using vRA or vCAC 6 there is a new way https://www.vmtocloud.com/vravcac-chef-client-extension/
Sorry, I meant that I CAN’T see the properties variable type, etc…
Hi admin, i must say you have very interesting content here.
Your website can go viral. You need initial traffic only.
How to get it? Search for; Mertiso’s tips go viral